This tech tip investigates the grid resolution to determine how big the virtual targets must be. The resolution in this context is how far the ball must move before the grid detects the movement.
We will create a 2D grid of P3Aware objects that will change color to yellow when they collide with the ball. The P3Aware objects will revert to their initial color after 5 seconds.
Creating a large number of GameObjects is resource intensive. We will limit the grid to 60 x 40 small cubes of about 5 pixels across. Instantiating this many GameObjects creates a noticeable delay. You can make the grid bigger if you don’t mind a longer delay. A temporary UI freeze is acceptable for this experiment, but it would be terrible for a real game.
For the impatient, jump to the last section for the conclusion.
This script makes the GameObject change color when it collides with the ball. The object reverts to its original color after 5 seconds.
Create the file Assets\Scripts\GUI\Home\PlayfieldCell.cs with this content:
using UnityEngine; using System.Collections; using Multimorphic.P3App.GUI; using Multimorphic.P3App.Logging; namespace Multimorphic.P3SA.GUI {
public class PlayfieldCell : P3Aware { private Color initColor; private float resetCountdown = -1; public override void Start () { base.Start (); initColor = gameObject.GetComponent<Renderer>().material.color; } public void OnTriggerEnter(Collider other) { if (HitByBall(other)) { resetCountdown = 5f; gameObject.GetComponent<Renderer>().material.color = Color.yellow; } }
// Update is called once per frame public override void Update () { base.Update (); if (resetCountdown > 0) { resetCountdown -= Time.deltaTime; if (resetCountdown < 0) { gameObject.GetComponent<Renderer>().material.color = initColor; } } } } } |
We need a parent GameObject for all the small cubes. Open the Home scene in the Hierarchy view.
Create an empty GameObject at the top level of the Home scene.
Rename the new object PlayfieldCells.
With the Home scene still in the Hierarchy view, right-click on PlayfieldCells, select 3D Objects/Cube.
Rename the new object PlayfieldCell.
Change the Scale to X=0.05 Y=0.05 Z=0.05
Select Is Trigger in Box Collider.
Set Light Probes to Off.
Set Reflection Probes to Off.
Set Cast Shadows to Off.
Unselect Receive Shadows.
Set the Materials Element 0 to GateMaterialIdle.
Add Component: Rigidbody.
Unselect Use Gravity.
Select Is Kinematic.
Add Component: Playfield Cell (Script)
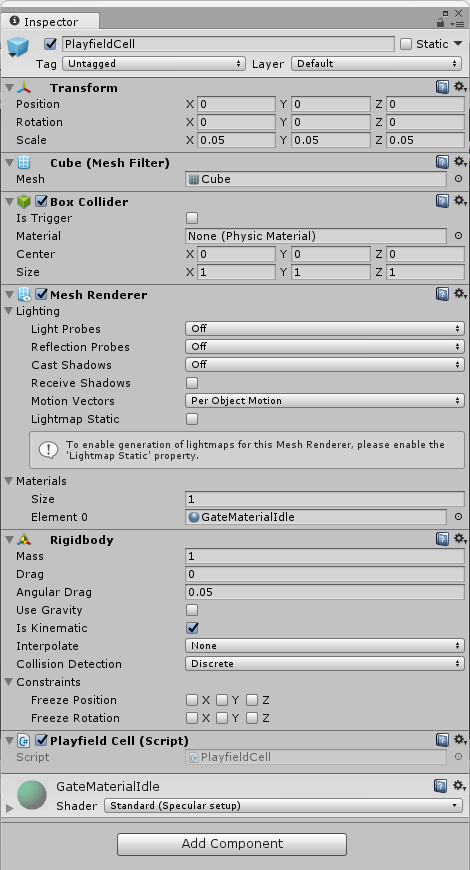
The PlayfieldCell object now looks like this:
Create a PlayfieldCell prefab from the PlayfieldCell GameObject like this:
In the folder hierarchy (left pane of the Project window), expand Assets\Resources\Prefabs and select Home.
Drag the PlayfieldCell object from the Hierarchy view into the contents pane (right pane of the Project window).
Delete the original PlayfieldCell in the Home scene.
In the folder hierarchy (left pane of the Project window), expand Assets\Scripts\GUI\Home.
Double-click on HomeSceneController to edit it.
Add this member variable:
private GameObject[,] playfieldCells = new GameObject[40,60]; |
Add this code at the end of the Start() method:
GameObject playfieldCellsParent = GameObject.Find("PlayfieldCells"); GameObject playfieldCellPrefab = Resources.Load<GameObject>("Prefabs/Home/PlayfieldCell"); for (int x = 0; x < 40; x++) { for (int z = 0; z < 60; z++) { Vector3 position = new Vector3(-5.75f + x * 0.05f, 3f, -1.5f + z * 0.05f); // center //Vector3 position = new Vector3(-8.75f + x * 0.05f, 3f, -3.5f + z * 0.05f); // top left playfieldCells[x, z] = Instantiate(playfieldCellPrefab, position, Quaternion.identity, playfieldCellsParent.transform); } } |
Because of the camera orientation, the world coordinates in the Home scene are unusual: x points down (typical -y) and z points right (typical x). The coordinate system was not rotated to correct this.
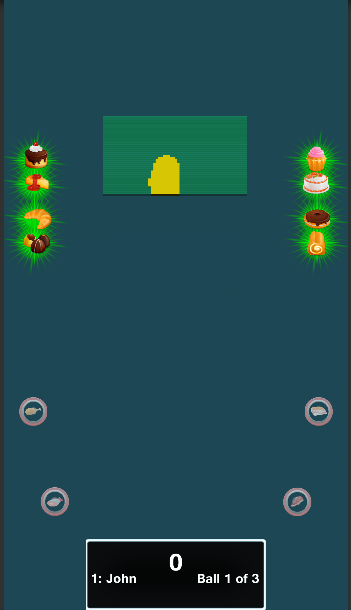
This code creates the 2D grid in the center of the screen. The comment shows how to create the grid in the top left corner. You can also adjust the coordinates to create the grid in a different position.
This is optional. It configures two function keys to enable or disable the IR grid in the simulator.
Edit Configuration/AppConfig.json. Add these key mappings to the KeySwitchMaps array:
{"Key":"F1", "ModeToGUIEvent":"Evt_EnableIRGrid", "Data":true}, {"Key":"F2", "ModeToGUIEvent":"Evt_EnableIRGrid", "Data":false}, |
Click the Play button. Press s to start the game. Press l (lowercase L) to remove the obstructing dialogs. Drag the mouse over the grid of P3Aware objects. If you edited AppConfig.json, you can press F1 to enable the IR grid overlay or press F2 to disable it.
The MouseBall in the simulator derives its position from the Unity cursor. This is more precise than the IR grid on the physical machine.
Build, install, and run the game with the glass off.
Press F1 or F2 to enable or disable the IR grid.
Grab a ball and move it by hand over the screen. Also try to shoot a ball with the flipper.
When moving the ball with the glass off, remember the ball collides with the volume between the old position and the new position. That can cover a large area if the two positions are far apart (like when you lift the ball and place it elsewhere). At worst, just wait 5 seconds and the P3Aware objects will reset themselves.
To move the grid of P3Aware objects, change the grid position in HomeSceneController, for example, pick the coordinates for the top-left corner of the screen. Rebuild the application, install and run the game again.
The IR optos are located to the left and right of the screen, providing higher vertical resolution than horizontal.
The vertical resolution is about half a ball width. This remains nearly constant across the entire screen height.
The horizontal resolution is typically between 2 and 3 ball widths. This degrades within 1 inch of the walls due to a lack of ray intersections, reaching its worst in the top corners where the resolution can reach up to 6 ball widths. A similar degradation occurs in the bottom corners, though those are out of reach underneath the apron.
For more guidance near the wall, take a look at the wall virtual targets. Start the game in the simulator, select “Playfield(Clone)” in the Hierarchy view. In the Inspector, enable “Show Gates”. The sensitive areas extend well below the wall to compensate.
For best results, create your ball-sensitive objects at least 1 ball height tall and between 2 and 3 ball widths wide, and maintain some distance from the wall.
Compare that recommendation to the crates in Lexy Lightspeed or the germs in WAMONH.
This does not mean you cannot have smaller ball-sensitive objects. After all, the cubes in this experiment were very small. What it means is that if you pack smaller ball-sensitive objects close together, the ball will hit multiple objects simultaneously.